A few simple steps to add a soft border to an image using Adobe Photoshop CS6.
 Depending on your site layout, a hard edge around an image on a web page can stick out like a sore thumb. Most image editing tools will help you soften the border a little. Here we’re using simple masking in Adobe Photoshop CS6 on OS X to do the job.
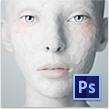
 First of all, open the image in Photoshop.
 Now use the Rectangular Marquee tool
 ![]() to select the outer edge of the border you’d like to add (the blurred edge will start on the inside of this box).
to select the outer edge of the border you’d like to add (the blurred edge will start on the inside of this box).
 Next click the Add a mask button
 ![]() on the Layers panel.
on the Layers panel.
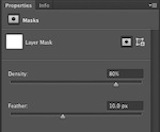
You should now have a transparent hard border around your image. Use the Density and Feather sliders in the Mask Properties area to soften this border.
 Feathering controls the width of the softened border. The larger the number the wider the blurred border will be. Density controls the strength of the mask – the lower the number the more the underlying image will show through. Play around with the settings to find the look you want.
 Finally use Save for Web to export your image. An effective soft edge requires the foreground and background colours to be blended so you will need to set the Matte colour to match the background colour of your web page.